|
Shelter/ Camp
CAMPSITE
Avoid
· Avoid Wind, steep mountain sides (rock falls), poor drained areas and marches (especially if you want to avoid Mosquitoes).
· The shelter should be close to water, but avoid riverbanks and creeks, after a rainfall you could easily become very wet or worse as the water level rapidly rises.
· Avoid valley bottoms as it is often colder than higher ground (sides of the valley).
· In winter stay away from sloping terrain to avoid Avalanches and stay away from bottom of hollows as they will soon be filled with snow drifting in the wind.
· Avoid beginning too late setting camp or building a shelter. Begin before it gets dark and before you get exhausted. From may to august darkness is not a problem as it is daylight 24 ours a day.
And if caught by a blizzard; make a shelter/snow cave ASAP or you may DIE.
Never travel in a blizzard!!
A good campsite is out of the wind, dry, enough space for your shelter and has easy acsess to firewood and water, preferably in a south facing hillside.
Keep in mind that the winter temperature can vary over a rather small area. 6. January 2010 the temperature at Bodř airport was -11 degrees Celsius. At my house 10 kilometers away it was -15 degrees celsius, but just 2 kilometers from my house it was -26 degrees Celsius. The height difference between my house and the lake (-26 degrees) is only 5 meters.
The warmest areas are near the sea.
Keep your campsite in order
It is important to keep the camp tidy and your equipment at one place, safely stored. Keep your equipment in the pack or hang it up at the same spot every time after use.It is not funny running around looking for missing things when you need them.
And a tidy camp makes your stay a little more pleasant. No need to live in a garbage heap.
Latrine
If you stay more than one night at a campsite it is important to dig a latrine. Make a hole in the ground half a meter wide, long and deep. Be sure that the content of the latrine don`t pollute nearby water sources and that it is downwind from your camp.
To keep the smell and flies away toss a little earth in the pit after use.
It is also a good idea to keep a kit for washing up at the site. Hygiene is important also in the woods.
When the hole is full just fill it up and dig a new one.
Toilet paper is not neccesary. No need for "poluting" the woods with a lot of white and brown paper strips.
One could use grass, leaves (rowan, my favourite), ferns or moss.
In winter one could use snow balls. It is not as cold as expected. And don`t worry about frostbite unless you use a very long time to wipe, it is seldom cold enough to hurt you.
SHELTERS
The easiest way to camp is to have a man made shelter with you.
A tarp or a tent is both good choises, depends a little on wich time of year you are out.
Be sure that the tent is of good quality and will withstand rain and strong wind.
TARP
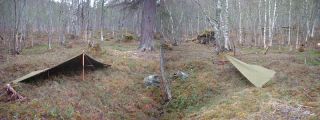
A tarp for shelter is often enough for most of us when out in the woods. Most of us is out in rather nice weather anyway.
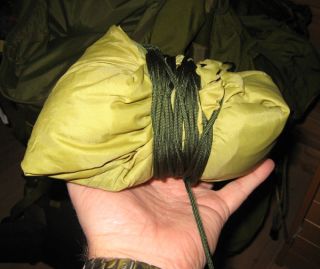
The tarp does not have to be expensive. A green plastic tarp bought at any gas station is more than enough. I mostly use the 4 X 6 meter version. It is rather bulky but weigh almost nothing. And it is so cheap one could store (bury it or lay it under some rocks) it on a nice campsite until next time one comes by not bothering wether somone steal it or the mice eat it. I also use a tarp wich used to be the roof of an A frame tent I had as a kid. It is 2 x 3 meters and enough to make a small tarp shelter in good weather. It packs quite small (picture below). This tarp was destroyed in hard wind during an outing fall 2008. Guess it was a bit old and weared.
The “Mountain tarp” from Jerven (Wolverine) I highly recomend.
It is expensive, yes, but it i a very good and strong tarp with lot of uses. It could be used as shelter, poncho, "space blanket" and emergency shelter. Most of this is also shown at Jerven`s homepage.
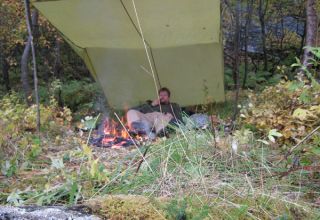
A tarp (Mountain tarp from Jerven) setup is shown below. I`ve laid the tarp out between two neighboring rocks (natural shelter). The rocks give shelter from the wind and also the rain. The tarp gives aditional shelter from the rain.
A tarp could be used for many types of shelter. Only your imagination is the limit.
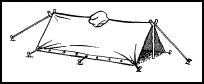
Many of you own a US poncho or similar. These can also be used to make shelter. Make an A frame from saplings and strap the poncho over it or you can do as shown on the picture below. Use some paracord/string and two Y shaped sticks. Lay the poncho over the string and peg it to the ground. The pictures show both a single and two poncho setup.
Remember to close/tie off the hood. Lay branches on ground for bedding and add sidewalls if needed.
 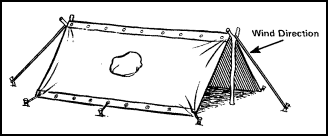
THE TUNNEL TENT
The most commonly used tent in Norway is the tunnel tent. This type of tent stands in strong winds and are fairly waterproof. And you can have your stove out in the vestibule.
This is very important in winter.
Yes, I know there are warnings about burning a stove in your tent but in -30 degrees one wants the heat it provides.
No matter what some claim, a tent costing 7000 kroner will be just as cold as one costing 1000 kroner in the middle of the winter.
There are of course differences in quality (at least there should be).
Another thing about these tents is that you can dig out the snow in the vestibule, making more space and most important a cold level. This is where I place the stove. Warm air raises, cold air sinks.
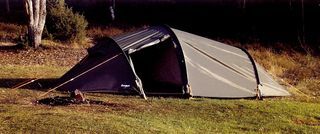
Make sure the tent is big enough. This is very important in winter conditions. Most two man tents have barely enough space for one.
I own a Wild Country Zephyros 2 (Terra Nova). This tent has room for me and my rucksack and not much else. Can`t for my bare life see how two grown men could fit in this tent at all.
Imaging spending a week during a blizzard in a “two man” tent with a friend and all your gear (you wouldn`t leave your gear outside, would you?). You better be very good friends then.
The tent producers are constantly making you believe that you need an expedition tent costing almost a months pay. But a fairly cheap tent (the price range between the junk and the expedition tents) is more than enough for most of us. I however recommend storm mats on the tent as do the producers, but these you can make and sew on yourself. A nylon car cover provides cheap, good materials for this.
LAVVU/ TIPI :
The LAVVU is the old tent home of the saami people, reindeer herders. In earlier times it consisted of reindeer hides laid over several interlaced poles (anything from 10 to 20 poles) making a cone. Just like the American tipi, but slightly lower, to ward of the wind.
Nowadays they use a piece of canvas, plastic or a ready made one of polyester/cotton. Like the one on the picture below. (It is a one-pole version from Venor).
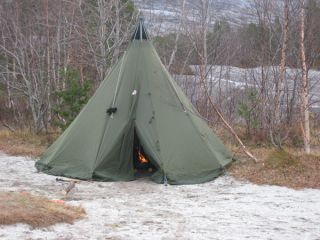
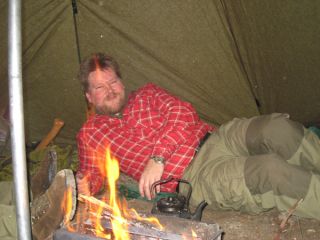
The lavvu`s force is the fact that you can light a fire inside the tent. It`s warm in winter, and provides a mosquito free tent in summer. And besides, one can smoke meat or fish in it. Just hang it up inside the tent and the smoke from the fire will do the rest.
But it is important to adjust the draft in the tent to prevent it beeing filled with smoke.
The downside of these tents are that they are quite heavy. My on pole version weighs 6.7 kilos. But they are often used in winter and then it is packed in a "pulk" (snowsled).
The one pole lavvu`s are also not so good in very strong wind, not a high mountain shelter in other words.
The traditional lavvu`s with wooden poles are more suited in heavy wind.
Traditionally the kitchen area is straight ahed from the door (right at the picture below left). And one never moves over the kitchen area.
The wife and children are traditionally seated to the left and the man and the guests are seated on the right side.
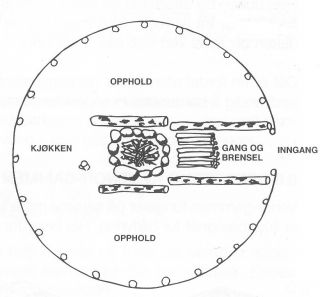 
The fire wood is in front of the fire (near the door) with the thick end of the wood always pointing at the fire.
The traditional floor was made of birch branches laid from the kitchen area to the door in a roof tile manner. The thick end pointing at the door and hidden beneath the branches (picture above right). This is again covered with dried reindeer hides.
In an emergency the lavvu can be made of spruce limbs laid over a cone shaped frame. Use 4-5 meter long poles. You can use anything from 4 to 20 poles if you like. It depends on how big a shelter you want.
If you then cover it with dirt it almost becomes a “gamme”, see below at long term shelters.
Army tent (buttoned tarp tent)
Not usually something used by civilians, but as I have mentioned the lean to made of a single military tent tarp (below), I will give a brief description of these cheap and bomb proof tents.
Every soldier was issued a diamond shaped tent tarp and one 5 meter nylon rope. These tarps have a double row of buttons along the edge on each side and can be buttoned together.
The idea is that each soldier carried his own tarp and joined up with his other squad members to make their tent (the tarp could also be used as a poncho as we were not issued rain gear). In reality we carried ready made tents on our rucks.
They are put together in different sizes, most usually (at least in my army days) 5, 7 and 10 pieces. I have 5 tarps and thus have made a 5 piece tent.
 Making the army tarp tent Making the army tarp tent
I’ve once stayed in such a tent during a winter storm lasting 3 days and the tent didn’t blow away nor ripped to shreds. They are extremely tough built. Actually I think these tents are better in winter than in summer because one can use snow on the sides to stop draft.
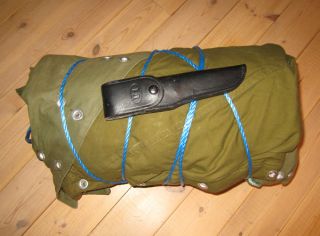
These tents are also extremely heavy. Each tarp weighs 1.5 kilos, making my 5 piece tent to weigh 7.5 kilos. If you travel by canoe or snowmobile they are fine though. The picture below shows the 5 piece version packed. I`ve added a Fallkniven F1 for size comparaison.
The only reason I have one is the cost. I paid less for it than I would for a Helle knife.
LEAN-TO:
Lean-to was commonly in use by lumberjacks and other people working in the woods as a temporary shelter. (It was used even in winter) It`s easy to build but requires a good deal of materials. The above left picture shows how it`s constructed.
The height is about 1,5-1,8m. Make the roof lean about 45 degrees to ward off rain, lower angle and the rain may run trough the roof. Use spruce limbs or big ferns to thatch the roof. Rosebay Willowherb is also a good thatching material. Even moss and turf could be used.
If you have a tarp you use that (above right). Add sidewalls if necessary.
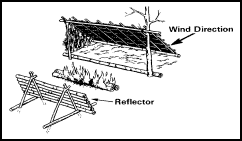
Use of a log fire for heating is the traditional way, "nying" in Norwegian.
You can build this shelter facing a rock to reflect heat into the shelter or two lean to`s facing each other, or do as the picture suggest, make a reflective wall.
A sort of one man lean to made of the Norwegian army tent tarp (diamond shaped tent tarp wich could also be used as a poncho). It is very low but will keep you out of the rain/snow and wind. The pole used on the one pictured below is the original two piece tent pole wich also dubbles as candle holders.
WINTER SHELTER:
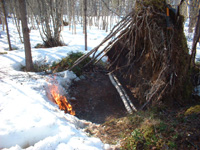
Winter shelters do not have to be time consuming or difficult to build. Some times it is enough to dig down in the snow, making a snow trench or digging into the snow to make a sort of "lean to", like the one on the photo below.
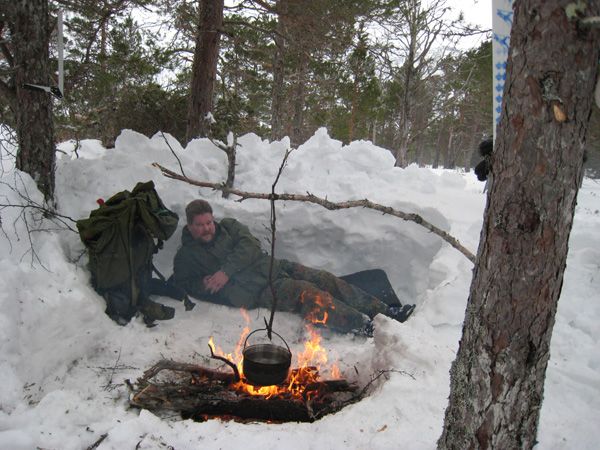
The one on the photo above was just used for a quick coffee brewing stop. If I was going to spend the night I would have used branches from two downed pines lying just behind the shelter as extra insulation for the bed, and stretched the tarp I had in my rucksack over the bed area to ward off drifting snow and as a heat reflector. The "hole" was dug out in about 15 minutes. The adding of extra bedding material and tarp would add 30 minutes to the construction time I guess. A nice "warm" shelter built in no time.
If I didn’t have a sleeping bag I would have used a log fire for warmth during the night.
SNOW HUT/IGLOO:
The snow hut can be made in two ways.
The first and easiest is to just make a pile of snow, make sure it is compact. Let it freeze and harden for some ours and then hollow it out. To make sure the dome walls have an even thickness one may stick small twigs of even length trough the pile. When you meet these you stop digging.
This kind of hut was used by Indians in Alaska and Canada and is called a Quinchee. Don`t make the shelter bigger than necessary.
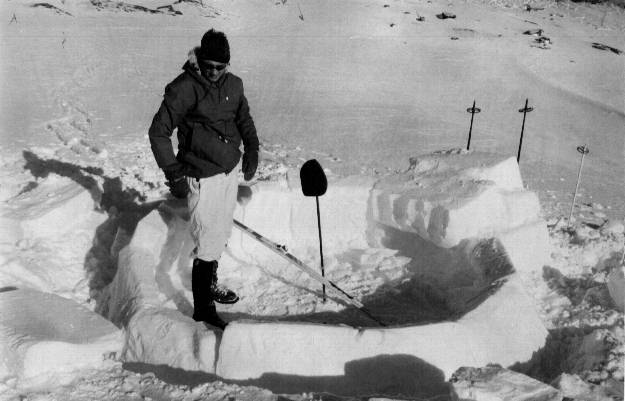
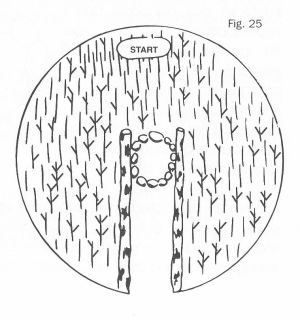
The other way to make an igloo is a little bit more complicated. First mark a circle as wide as you want the hut.The ideal space to build consists of ca. 30cm loose snow uppermost and packed snowbeneath.Cut blocks of snow, the snow must be compact, cut from a snowdrift, and lay them in a circle (see picture above). Shape the blocks to a spiral and lay down next layer and so on. The last blocks may need a little support as you fit them in position.
Cut an entrance trough the blocks or dig one beneath them. The sleeping level should be higher than the entrance to create a cold level you can use for storage etc. Use a candle for lighting and warmth.
Remember to make a small air hole in the roof.
These shelters are however not something you would build as a long term shelter along the coastline. The weather is much too unprdictable for that.
LONG TERM SHELTER:
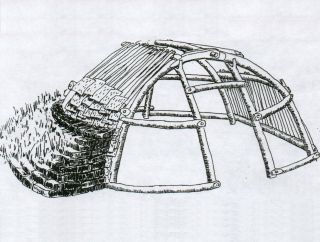
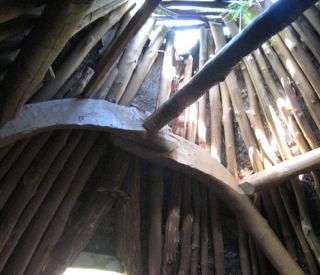
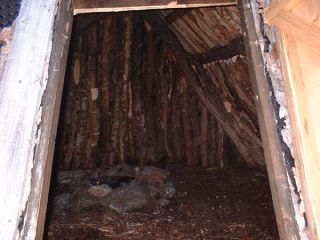
The common long-term shelter of the north is a “gamme”. It is a saami sod house made with a wooden frame covered with lots of debarked poles, birch bark shingles and peat/turf. It`s a little bit like a wigwam. It takes some time and a lot of resources to build. But once built it stands for about 30 years. Below is a drawing of how the "gamme" is constructed. The frame is made of 2 "half circles" with a "roof beam" between them. The two "half circles" are usually made of mountain birch which often is very crooked and thus have the right shape. Some horisontal branches are pegged in place (wooden pegs) and the whole construction is covered with poles, birch bark and pear/turf. Below right is a picture of how the frame is joined together.
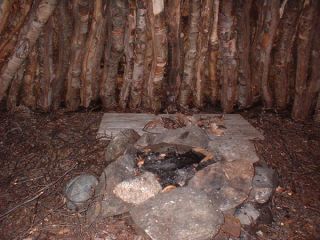
There are two types of gamme. The oldest types have a smoke opening in the roof and are heated with a fireplace in the middle of the floor. The more modern type has an oven installed. Gamme have been used as housing for both people and animals in centuries.
The one at the picture is the normal size found today but earlier they could be 4-5 times as big.
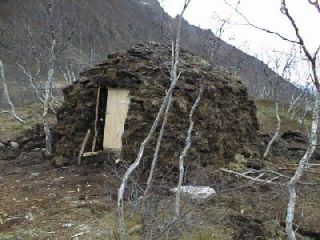 
The smaller sod house below is probably used by hunters. It is room for two people and their equipment.
There are several of these shelters scattered around the forests and mountains of northern norway. Many of them are marked on the map (N50 maps), and they are open, offering shelter to anyone passing by.
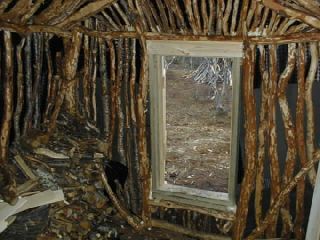
Livingspace in a gamme is managed in the same manner as the livingspace in a lavvu. At the third picture below you could see the "kitchen area" in form of a wooden "table".

NATURAL SHELTER:
Caves and overhangs (if they`re dry), between rocks, snow banks (dig into it), under downed trees, sand burrow, hole in snow around tree trunk.
The shelter doesn`t have to be much to look at just a place to keep you safe from the weather. If you plan to stay one may improve the shelter day by day.
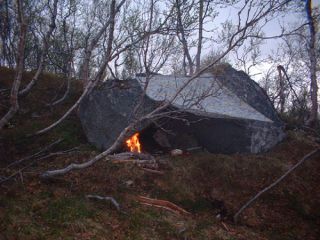
The picture below shows a shelter under a large Spruce. A plastic tarp gives addotional protection from the wind and acts as a reflective wall. The temperature when this photo was taken was about -10 degrees Celsius.
A natural shelter could be something like the downed tree beneath left. I`ve put down 2 logs just to show how one could easily make a bed. Two more logs and some branches from a spruce, juniper or pine on top of them, and the bed is finished. I one have a tarp that could be used to improve the roof. This shelter was fortunately facing the right way, away from the prevailing wind.
Be warned though. Downed trees can fall into place and kill or injure people under the root. Use your head, aka common sence out in the wilderness.
 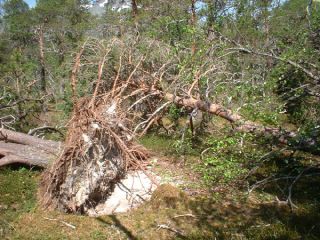
The downed tree above right is also an option for shelter. The shelter could be made with the aft tree as base and the sandy ground left open by the tree in the foreground could be used as bed for the fire. Then you don`t have to dig down to the sand. On mossy/peaty ground it is not a good thing to light a fire.
When I was a boy my buddies and I made a shelter under a large rock. Walls were made of stones and cracks sealed with moss. The floor was covered with birch branches and ferns. We stayed under that rock for 4 days while fishing in a nearby lake, and it was quite comfy. The shelter was still usable many years later when my uncle and me used it under a hunting trip.
SLEEPING WARNING & TIPS:
Sleeping in clothes holds moisture and chills the body.
Rule: Have little clothes on, but much insulation underneath (and over) you.
You will not freeze to death in your sleep; cold awakens you, unless you are very tired or drunk.
|